Originally published at: NeoPixel Countdown Game – BrainPad
Project Overview
NeoPixel with Joystick Control
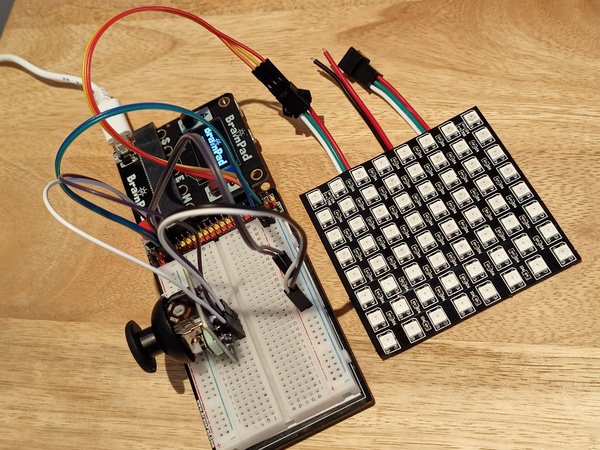
This engaging project combines the dynamic capabilities of 8×8 NeoPixel and an analog joystick to create a captivating countdown game. It offers both an exciting gaming experience and an opportunity to explore interactive electronics and how to code things.
How It Works
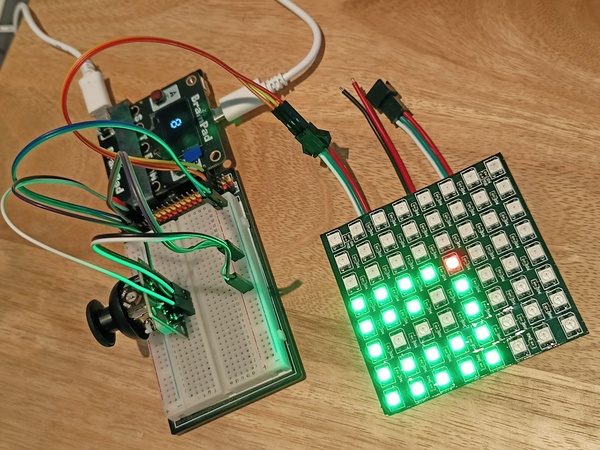
The core idea behind this project is to utilize the 8×8 NeoPixel matrix and the analog joystick to create an interactive game. Players control a pointer on the NeoPixel display using the joystick, with the goal of filling all the pixels with a green color before the countdown timer runs out. The code reads data from the analog joystick’s X and Y axes to determine the pointer’s position on the NeoPixel matrix. As players navigate, each pixel they pass over turns green, and the pointer remains red.
Hardware Requirements
This project is specifically tailored to interface with the BrainTronics kit, which comprises an analog joystick and a single-color LED light as a Neopixel with a solo pixel. This color LED light simplifies extended learning and testing of Neo functions. However, for the purpose of this project, we have used an 8*8 NeoPixel matrix containing a total of 64 pixels, and we’ve used the BrainPad Pulse as a microcomputer. It’s important to note that this project is also fully compatible with BrainPad Rave and BrainPad Edge microcomputers. The fundamental hardware components integrated into this project contain:
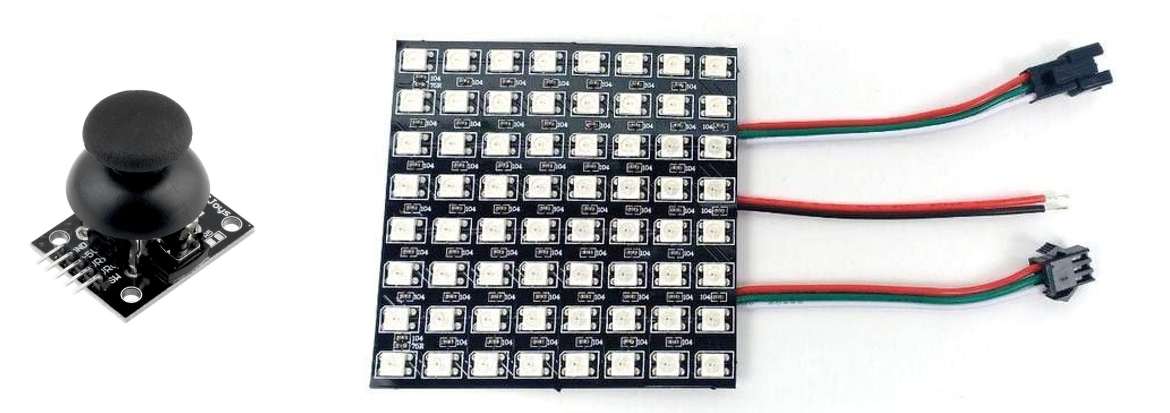
8*8 NeoPixel: These small, programmable RGB LED matrices offer a wide range of colors and lighting effects, making them perfect for creating vibrant displays and animations.
Analog Joystick: This input device provides precise, multidirectional control and is commonly used in gaming and electronic projects. It translates physical movements into variable input values for a smoother user experience.
Hardware Connections
NeoPixel: Connect the NeoPixel to a suitable pin on your chosen microcontroller (e.g., pin 16). Ensure proper connections to the 3.3V, GND, and DIN (data in) pins.
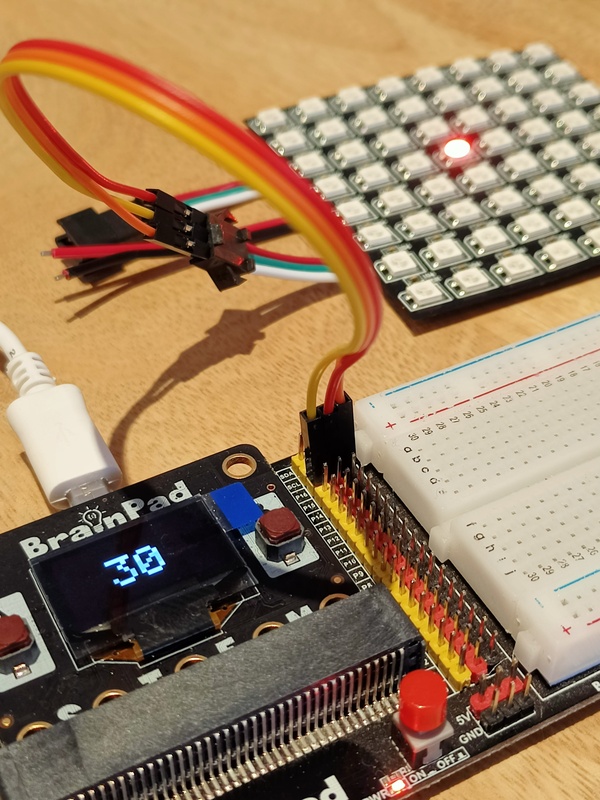
Analog Joystick: The analog joystick requires five connections: 5V, GND, VRX (X-axis data), VRY (Y-axis data), and SW (pushbutton switch). For this project, only 5V, GND, VRX, and VRY are used. Connect 5V and GND to the breadboard and then connect VRX to pin number 0 and VRY to pin number 1 on the BrainTronics board. Additionally, connect two wires for 5V and GND from the same line as the 5V and GND wires of the joystick on the breadboard
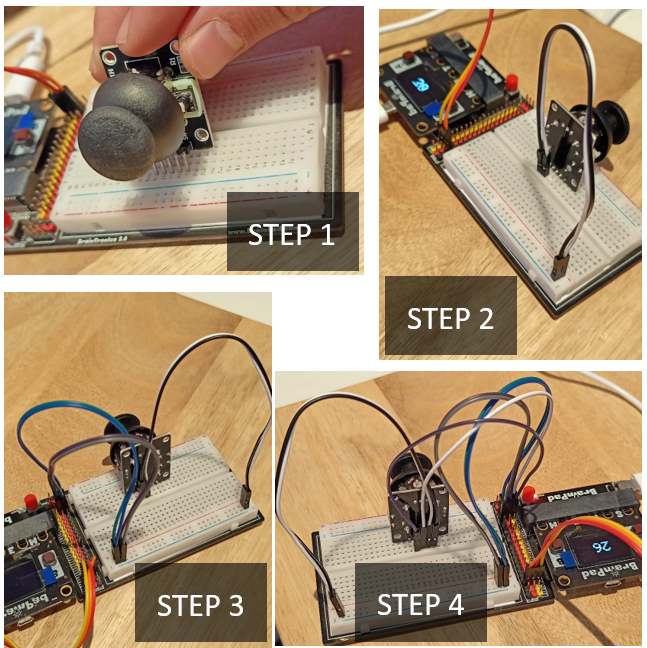
Code Overview
The code for this project is designed to run on your microcontroller. It initializes the NeoPixel matrix, sets up the joystick inputs, and controls the game’s logic.
The code sample below starts with getting x,y position form the joystick and color each pixel we passed on with green color and keep the pointer with red color.
h = 8           # height of NeoPixel
w = 8           # width if NeoPixel
n=30            # seconds of the games
a=h*w           # the number of pixels
Dim m[a]        # array for storing the pixels we've stepped on it
#initialize the array with zeros
For i in range(len(m)):m[i]=0:Next
NeoClear()
@loop
s=0             #cumulative sum for pixels array
x=ARead(0)      #getting the x axis data analog joystick
y=ARead(1)      #getting the y axis data analog joystick
x = Trunc(x  * (h / 100))   # mapping the x data from standard range (0,100) to (0,64)
y = Trunc(y  * (w / 100))   # mapping the y data from standard range (0,100) to (0,64)
pxl()           #function to get the pixel index by x & y
m[p] = 1        #changing the index value of the stepped on pixel from 0 to 1
# check if all pixels are stepped on
For i in range(len(m))
    If m[i]>0:NeoSet(i,0,10,0):End
    s = s + m[i]
Next
NeoSet(p,10,0,0)    #coloring the pointer in different color
NeoShow(16,a)
goto Loop
@pxl
    p = x * w + (x & 1) * (w - 1) + (1 - 2 * (x & 1)) * y
return
Countdown and Outcome
The final version of the code includes a countdown timer and handles the game’s outcome. Players have a limited time to fill all the NeoPixel pixels, and they either win or lose based on their performance. The countdown timer and sound effects add an extra layer of excitement to the game.
h = 8           # height NeoPixel
w = 8           # width if NeoPixel
n=30            # seconds of the games
g=0             # store the time
a=h*w           # the number of pixels
Dim m[a]        # array for storing the pixels we've stepped on it
#initialize the array with zeros
For i in range(len(m)):m[i]=0:Next
t = TickMs()    # store the time
NeoClear()
@loop
    s=0             # cumulative sum for pixels array
    g = TickMs()
    x=ARead(0)      # getting the x axis data analog joystick
    y=ARead(1)      # getting the y axis data analog joystick
    x = Trunc(x  * (h / 100))   # mapping x data from range(0,100) to (0,64)
    y = Trunc(y  * (w / 100))   # mapping y data from range(0,100) to (0,64)
    pxl()           # function to get the pixel index by x & y
    m[p] = 1        # changing the index value of stepped on pixel from 0 to 1

    # check if all pixels are stepped on
    For i in range(len(m))
        If m[i]>0:NeoSet(i,0,10,0):End
        s = s + m[i]
    Next
    NeoSet(p,10,0,0)    #coloring the pointer in different color
    cou()               #function to calculate the timer
    NeoShow(16,a)
goto Loop
@pxl
    p = x * w + (x & 1) * (w - 1) + (1 - 2 * (x & 1)) * y
return
@cou
    IF n>0 && s < a
    LcdClear(0)
    LcdTextS(str(n),1,40,20,4,4)
    LcdShow()
        IF  g - t  > 1000
            t = TickMs()
            n=n-1
        End
    End
    IF n = 0
        dim m[8]=[250, 220,250, 200, 100,80, 60, 40]    # Failing sound frequency
        dim n[8]=[4,4,4,4,3,3,2,1]                      # Failing sound durations
        for i in Range(Len(m))
            LcdClear(0):LcdShow()
            h=1000/n[i]
            LcdTextS("Losser!",1,1,20,3,2):LcdShow()
            Beep('p',m[i],h)
        Next
        Wait(2000)
        Reset(0)
    End
    If s > a-1 && n>0
        NeoSet(p,0,10,0):NeoShow(16,a)                  # coloring the last pixel
        dim m[8]=[262, 196,196, 220, 196,220, 247, 262] # Winning sound frequency
        dim n[8]=[4,8,8,4,4,4,4,4]                      # Winning sound durations
        for i in Range(Len(m))
            LcdClear(0):LcdShow()
            h=1000/n[i]
            Beep('p',m[i],h)
            p=h*1
            LcdTextS("Winner!",1,1,20,3,2):LcdShow()
            Wait(p)
        Next
    Wait(2000)
    Reset(0)
    End
Return
Customization:
You can easily customize several aspects of this project:
- Adjust the countdown time by changing the value of the ‘n’ variable in the code.
- Modify the winning and losing sound effects by editing the ‘m’ and ‘n’ arrays to create your preferred audio experience.
- If you decide to use a different size of NeoPixel matrix, update the ‘h’ and ‘w’ variables to match the dimensions of your chosen matrix.