Originally published at: GIF Pro With Rave – BrainPad
Project Overview
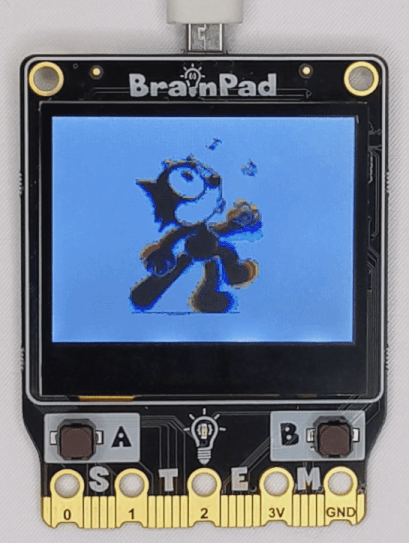
Displaying a GIF on a BrainPad Rave Microcomputer
Launch an exciting journey of displaying a GIF on the vibrant 160×120 colorful touch screen of the BrainPad Rave microcomputer. This project explores the seamless compatibility of Python graphics with BrainPad, showcasing the power of the BrainPad microcomputers in handling visual content.
How It Works
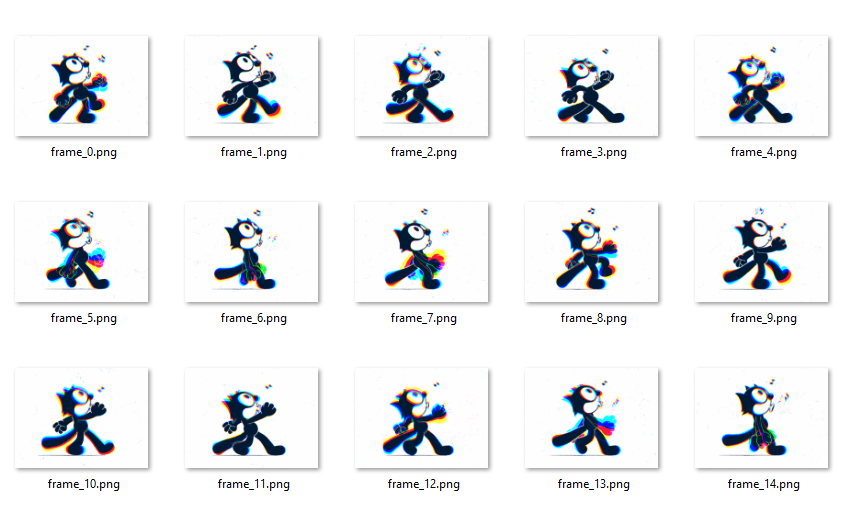
The script initiates a connection with the BrainPad Rave microcomputer, determines the number of frames needed for the GIF, converts the GIF into PNG frames, and sends each frame to the microcomputer’s frame buffer. The entire process is designed to leverage Python’s graphics capabilities and demonstrate the value of the colorful LCD screen on the BrainPad Rave.
Hardware Requirements
To make this project, we need just for :
- BrainPad Rave microcomputer
- USB cable
Software Requirements
Ensure you have Python 3.10 installed on your computer. Install the required library using the following command:
pip install DUELink

pip install pillow
Code Overview
Let us break down the Python code into smaller steps and provide a comprehensive explanation for each part:
import os
from PIL import Image, ImageEnhance
from DUELink.DUELinkController import DUELinkController

# Get the available communication port from DUELinkController
availablePort = DUELinkController.GetConnectionPort()

# Initialize DUELinkController with the obtained port
BrainPad = DUELinkController(availablePort)

# Set the folder name for storing frames
folder_name = "frames"
folder_path = os.listdir(folder_name)

# Function to convert a GIF file to a series of JPG images
def gif2png(file_name: str, num_key_frames: int, trans_color: tuple):
    # Check if the frames folder exists
    if not os.path.exists(folder_name):
        # If it doesn't exist, create the folder
        os.makedirs(folder_name)
        print(f"The folder '{folder_name}' has been created.")
    else:
        print(f"The folder '{folder_name}' already exists.")

    # Open the GIF file using the PIL library
    with Image.open(file_name) as im:
        # Delete the old existed frames
        for images in folder_path:
            if images.endswith(".png"):
                os.remove(os.path.join(folder_name, images))
        # Iterate through specified key frames
        for i in range(num_key_frames):
            # Move to the i-th key frame in the GIF
            im.seek(im.n_frames // num_key_frames * i)

            # Convert the image to the RGBA mode
            image = im.convert("RGBA")

            # Get the pixel data
            datas = image.getdata()

            # Create a new list for modified pixel data
            newData = []

            # Iterate through each pixel in the image
            for item in datas:
                # Check if the pixel is transparent
                if item[3] == 0:  # if transparent
                    # If transparent, replace with the specified transparent color
                    newData.append(trans_color)
                else:
                    # If not transparent, keep the RGB values
                    newData.append(tuple(item[:3]))

            # Create a new RGBA image with the original size
            image = Image.new("RGBA", im.size)

            # Put the modified pixel data into the new image
            image.putdata(newData)

            # Save the modified image as a PNG file in the frames folder
            image.save(f"{folder_name}/frame_{i}.png".format(i))


if __name__ == '__main__':
    frames_number = 15
    # Convert the input GIF file to a series of JPG images with a white background
    gif2png("game.gif", frames_number, (255, 255, 255))

    while True:
        # Loop through the frames and display them on the BrainPad
        for i in range(frames_number):
            # Open each frame, resize it, convert it to bytes, and then display it on the BrainPad
            image = Image.open(f"{folder_name}/frame_{i}.png")
            image = image.resize(size=(160, 120))
            image_bytes = image.tobytes()
            BrainPad.Display.DrawBuffer(image_bytes, 8) # color_depth = 4, 8, or 16
Customization:
- Color Depth:
Adjust the color depth in the DrawBuffer function which is 8 in our example. Higher values result in more realistic colors but slower processing. Experiment with values like 4, 8, or 16, you can learn more about BrainPad FrameBuffer from here.
- Hardware Variation:
Use BrainPad Pulse with a Black and White 128×64 LCD screen by modifying the size and color depth to “1”. Use a B&W GIF for a better experience.
- Language Exploration
Explore languages like C# or JavaScript on BrainPad from here to create the same project with logic-matching language syntax and take advantage of the microcomputer’s versatility.